Wednesday, March 9, 2016

Beam Me Up

I read the following on House*Tweaking:

We hired a contractor as this project was way beyond our DIY skill set. Our contractor worked closely with an engineer at a local lumber yard to create an LVL (laminated veneer lumber) beam specific to our roof pitch, room dimensions and length of span. Like I said, waaaayyyy-haaay-haaay beyond our skill set. 
An LVL beam is constructed of multiple layers of thin wood held together by adhesive. This allows for a smaller yet stronger structural support when compared to a solid wood beam.
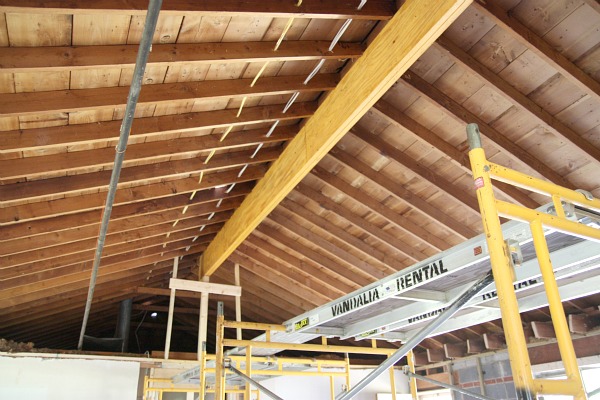
LVL Beam in Dana's house from House*Tweaking
I figured it was time to consult with a lumber company. Our designer, Julie, recommended Sudbury Lumber, so Maura made an appointment, and off we went.
We met with Anthony and described what we wanted to do. I had sent him the plan and some mark-ups that I had done. We didn't have an issue with the end of the beam that would be supported at the wall with the fireplace, adjacent to the garage, because the column that would hold up that end would sit on the concrete foundation. The tricky part would be the other end, between the kitchen and living room, because that would be centered over the hallway, and we couldn't really have a column smack dab in the middle of the hallway.
Anthony marked up our plan to show us what we would need to do.

Anthony also provided a sketch of how the beam should be supported so that the load is transferred properly.

If you notice the green highlight, it shows as a doubled floor joist. Ugh. This was going to be an issue since, as I said, we have a finished basement with a suspended ceiling. I had to do some investigation to see how difficult this was going to be. I was hoping that I could at least handle doubling up a couple of floor joists.
After removing a few ceiling tiles in the basement, here is what I found, minus the green and purple items as those would be new.

I partly lucked out because I discovered that there already was a set of doubled-up floor joists at the edge of the stairwell. Since the floor joists overlap the main beam, I couldn't have doubled-up floor joists directly across from the ones adjacent to the stairwell. I figured that I could add one shown in green. This would result in an angled header, shown in purple, but it ended up being directly over a support column. Luckily, again, there were doubled-up vertical 2x4s at the corner of the stairwell to support one side of the header. I would have to add a doubled-up 2x4 in the wall across from the stairwell. This wouldn't be bad because I would have to open up that wall, anyway.
Once I got the plan marked up as shown above, I forwarded to Anthony at Sudbury Lumber to get his stamp of approval. He said that it should be fine. He then ran his calculations on some software, and everything passed. Our 2-ply, 14-inch LVL beam ended up being 18 feet long. All of the lumber needed to for the structural work, including the design services, tax, and delivery, cost $463. Not bad.

Tuesday, March 8, 2016

"Let's Vault the Ceiling!"

It didn't take long for Maura to suggest vaulting the ceiling in the living room. She kept looking at pictures of renovations and loved how vaulted ceilings added to the space. I, being a frugal (cheap) engineer, was initially against it and tried to reason with her. "Sure, it would look nice, but it's not space that we can use." That didn't work. "It's just extra space that we will need to heat." No luck there, either. And when she showed the neighbors the pictures that she had found on-line, they agreed that it would be wonderful to vault the ceiling. So that was it. Time for me to start looking into vaulting the ceiling.

I started taking some measurements and tried to figure out what this proposed vaulted living room ceiling would look like. Here is a rudimentary rendering that I came up with.
I wasn't really crazy about it, and later I figured out that the the header beam (red block) didn't line up with the main flooring beam (blue block) that runs down the center of the house. That beam actually lines up with the peak of the roof. That created problems with transferring the load since the load-bearing wall between the dining room and living room didn't line up with the main beam under the floor, which is held up by support columns in the basement. I knew that this would be a problem because I didn't want to mess up our finished basement by adding another support column or two in our family room.

Maura got an estimate from her brother's friend, who does construction, to open up the wall between the dining area and living room and vault the living room ceiling. It was just over $10,000 to do the demolition, install a laminated beam, vault the ceiling, insulate, drywall, and plaster. This didn't include any of the kitchen renovation. There would be plenty more to spend on that!

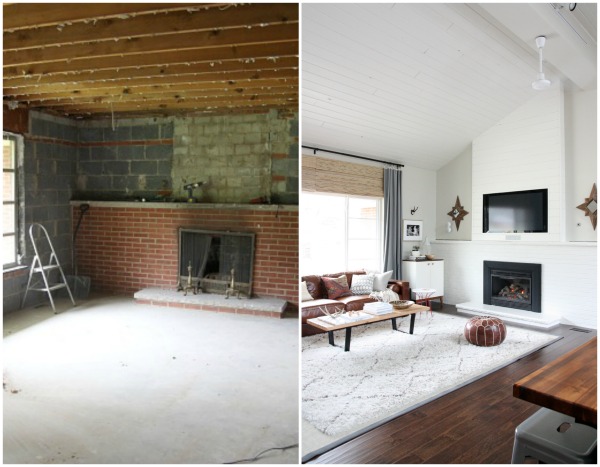
I did a little on-line browsing for myself and stumbled upon this


Wow. What a difference! House*Tweaking is a blog created by Dana, and she really does a nice job with it. She has a ton of info on how she and her husband vaulted their ceiling with plenty of before, during, and after pictures. And that's just one project. If you're into home improvement and decorating, you really ought to check out her blog. Not only did it inspire me to vault our ceiling, it inspired me to write this blog. Discovering her blog really helped me out, so maybe others could glean some information from my experience renovating our house.

I showed the House*Tweaking blog post to Maura, and she was impressed. I said that instead of vaulting just the ceiling in the living room, we might as well extend it across to the dining area and really open things up. Maura was all for it with no further convincing needed. 

When you read the blog, Dana constantly mentions how handy her husband is and how much money they were able to save by having HH (Handy Hubby) do the work. The more I read the blog, the more I thought, "I think I can do a lot of this work myself." I didn't come out and tell Maura this right away, though. I had to work on building my case.

Sunday, March 6, 2016

Cabinets

Shortly after settling on a layout for the new kitchen, we started shopping for cabinets. Boy, new kitchen cabinets sure can be expensive! After visiting a couple of places, we happened upon Joseph Ricardi Designs, which happens to be located only about 3 miles from us. Joe is a really nice guy, and he took our Plan A and provided us with these 3-D renderings.


I told Joe that I was thinking about installing the cabinets myself, and he was fine with that. His price was a lot less than the first place we went to, and he was also quite a bit less expensive than Lowe's.

We held on to the drawings for a few months, and decided to order our cabinets through Joe. He was great. It was nice that his showroom was so close by because we have had to go in a few times, once with Julie, our designer. It has been a pleasure working with both of them!


Which Plan to Choose?

Last summer, Maura consulted with an interior designer. We met Julie Forte when our kids were swimming together in high school. Julie does excellent work! Maura told Julie that we would like to open up the rooms. Julie came over one day, took measurements, and came back with three options for us.


Plan A


Plan B


Plan C


Maura and I ruled out Plan C because we weren't really fond of the angled peninsula. Both Plan A and Plan B had their benefits. Plan B had a bigger opening, but we would have less cabinet space. It did offer a nice big island, though. After some deliberation, Maura and I decided that we liked Plan A the best.

Saturday, March 5, 2016

Before

I've been thinking about doing this blog for a while, and I figured it was time to get started.

We bought this ranch house in July of 1998, almost two years after we had our second child. Our old, 2-bedroom village colonial just wasn't cutting it for us anymore. Other than re-wallpapering, and installing a laminate floor, we really did not do much to the kitchen. We figured that we eventually would, but with two young kids and a dog around to mess things up, we figured that we would hold off. (Plus, it's expensive to do a kitchen renovation!)

On a side note, this is house happens to be the house in which I grew up. It was built in 1968, and I lived here with my father, mother, and brother, until my parents sold the house in 1986. My wife, Maura, and I bought the house in 1998 from the couple who bought it from my parents.

For years, Maura had been talking about a new kitchen. She would cut out pictures of magazines of kitchens she liked, and she also did some e-cutting and pasting from on-line pictures. Not surprisingly, one of Maura's favorite TV channels is HGTV. After a lot of hemming and hawing, I finally agreed that it was time to take the plunge and get going on the big kitchen renovation.

Here are some pictures of our kitchen from the Fall of 2015, before we started. Admittedly, it needed updating.

 Looking from the dining area 


Looking in from the back door


 Looking in from the hallway


And here's the dining area.

Looking from the kitchen


And, by the way, the renovation includes knocking down the wall between the dining area and the living room to create an open-concept. Here's what the living room looked like before we started renovating.

Looking in from the hallway


 Looking in from the front door


 The boxes in front of the window are the new hardwood flooring.


The hardwood Maura selected is Bellawood's Brazilian Pecan from Lumber Liquidators. It was one of the more expensive types in the store, but I have to admit that it does look nice.


I had to pick the flooring up in April of last year (and it's still sitting in my demolished living room!). To save on the delivery charge, I figured I'd pick it up myself. 19 boxes at 87 pounds each came to over 1,650 pounds. At least it all fit in my vehicle so that it only took one trip. That was a good workout unloading that and moving it into the living room!

The biggest load my Durango has carried!


 Well, that's my first blog post. Thanks for reading. I still have a lot of catching up to do!